Bicycle maintenance guide: How to replace your brake pads
Bicycle maintenance guide: How to replace your brake pads
Posted on 4 Jul 2017
Everyone enjoys going fast on their bike, but it wouldn't be as fun if your brakes weren't able to stop you!
Those little blocks of rubber we call brake pads wear over time (that's what they're designed to do!), so replacing them is up there with the most common maintenance tasks you'll be doing over the life of your bike.
Knowing exactly how to replace them is going to save you a lot of time and hassle, as well as money-poorly maintained breaks can start to wear and damage the rim, meaning that if you leave them too long you could be needing more than just new pads!
Andrew, Cytech trainer and assessor for Specialized Canada, is on hand to explain a bit about brakes and how to replace the pads.
The different types of brakes
Brakes can come in many shapes and styles, from side-pull to cantilever, V-brakes to disc brakes and more in-between. One thing they all have in common? Brake pads.
Brake pads are an easily serviced part of your bike and are designed to abrade away during normal use, so need to be replaced multiple times during the life of your bike. One of the often overlooked parts of changing your brake pads is making sure you buy the correct type of replacement parts. Each brake type shown below requires a different style of brake pad.
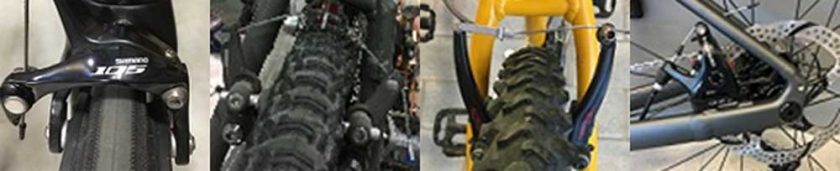
Finding the correct pads mainly requires you to know the type of brake you have, but then the make and model are useful as they can differ. For example, the brakes shown above would be (from left to right):
- Side-pull style, Shimano 105
- Cantilever, DIA-COMPE XC
- V-brake, Avid Single Digit 3R
- Flat-mount disc brake, TRP Spyre C
Be aware of the material your wheel rim is made from as some pads are made for certain rim materials.
You also have to be aware of the material your wheel rim is made from as some pads are made for certain rim materials. Once you have all this information, your local Cytech accredited bike shop will be able to supply you with the correct replacement. You could go even further and refer to the manufacturer's website to get the original part number, but this is often unnecessary.
Brake adjustments
Most brakes will have macro and micro adjustments-taking the Shimano side-pull style brakes as an example you have a quick release on the side of the brake (macro) and a barrel adjuster located where the cable enters the brake from the top (micro).
The quick release allows you to take the wheel in or out of the bike without the pads hitting the tyre.
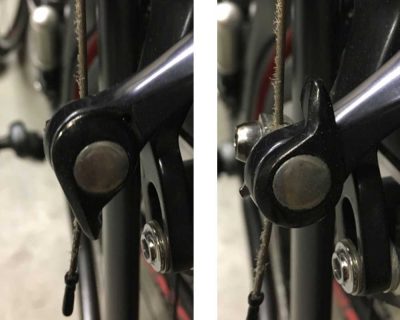
Shimano side-pull style brakes. Quick release adjustment: closed (left) and open (right).
The barrel adjuster increases and decreases the tension of the cable-when the adjuster screw is turned counter-clockwise and extended, the cable tension increases and tightens the brake. Turned clockwise the height of the screw reduces thus loosening the brake.
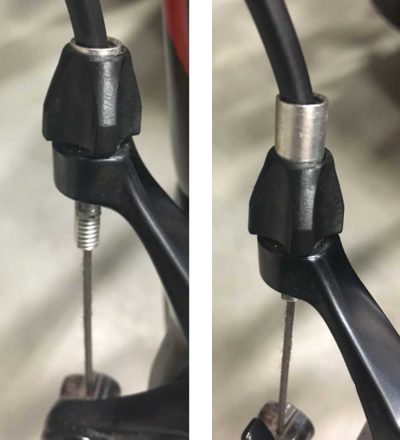
Shimano side-pull style brakes. Barrel adjuster: fully reduced (left) and fully extended (right).
Brake pad replacement
- Open the macro adjustment on the brake and reduce the micro adjustment completely.
- Remove the brake pad from one side and install the new pad, making sure the pad is oriented in the right direction and is on the correct side. Only tightening the bolt to a ‘finger tightness', make sure the washers and spacers are in the correct configuration - you can use the pad on the other side as a guide. These washers help to ensure correct pad contact with the rim.
- Now we repeat the process in step 2 for the remaining brake pad.
- Close the macro adjustment and extend the micro adjustment until the pads almost touch the rim.
- Now we must centre the pad on the braking surface.
- Toe the pad in to ensure proper engagement with the rim and eliminate the chance of brake squeal. A quick way of doing this is to put an elastic band around the back of the brake pad and extend the micro adjust until the pad engages with the rim-tighten the bolt (which should still be at finger tightness from the previous steps) to the correct torque.

- Now that the pads are correctly positioned turn the micro adjust clockwise until your brake lever pull is where you like it to be.
- You're ready to ride!
Some brake pads are a 2-part system, a ‘carrier' and a slide-in pad. In this case, once the carrier is positioned using the steps above all you need to do to change the pads is loosen the small fixing bolt on the carrier and slide out the pad (it slides out opposite to the rotation of the wheel). Slide the new pad in and tighten the fixing bolt to the correct torque and you are done.
This process can take a few goes and a bit of practice to get perfect. Once you get it though you'll be safe in the knowledge that you'll never be without stopping power on your bike, meaning you can enjoy those descents instead of worrying whether your brakes will be able to stop you! Don't forget there's always your nearest Cytech qualified technician to seek advice from if you get stuck. Happy riding!