Bicycle maintenance guide: How to set up your mountain bike suspension
Bicycle maintenance guide: How to set up your mountain bike suspension
Posted on 20 Sep 2017
If you missed this year's Cycle Show at the NEC in Birmingham, you missed out on seeing Cytech master technician Jules presenting on the main stage imparting his knowledge about suspension and all the tips and tricks below amongst other things!
It's not uncommon to find suspension on a mountain bike these days. In fact, you'd have to hunt pretty hard to find a mountain bike without suspension on!
It's surprising then that most people will be riding a setup that is less than ideal. Maybe they'll have too much spring preload, perhaps the rebound and compression dials are not set to allow the suspension to track the ground correctly, or maybe the air pressure has not been set properly resulting in a ride that's either too hard or soft.
Jules is here to help with some of the more common setup errors that people can be unaware of, which work equally as well for a hardtail as a full suspension bike-just omit the rear shock procedures.
Tyre Pressures
We'll start with a very obvious point (which doesn't even involve any fiddling with suspension)-tyre pressures. The tyre is the first point of contact with the trail and will determine the overall amount of grip you have. Over-inflate the tyre and you'll lose traction, slide out in the turns and have a much firmer ride than is ideal, under-inflate the tyre and it'll squirm about underneath you in the corners forcing you to make unnecessary steering corrections mid-corner. Again, not ideal.
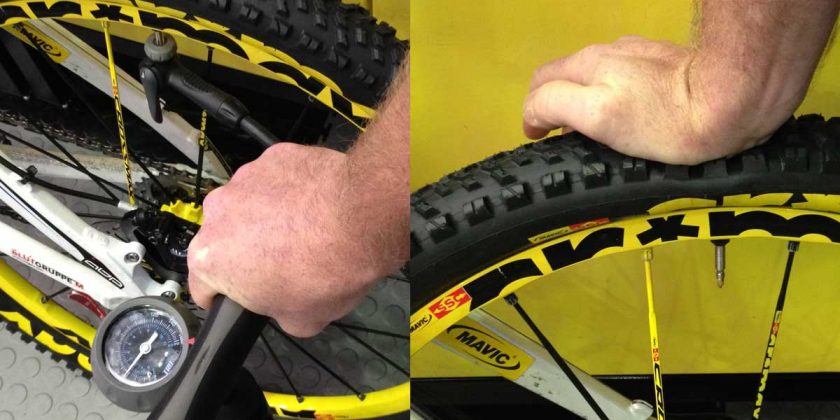
To cure this you'll need a floor pump with an accurate pressure gauge, using the manufacturers' recommended pressures (usually found on the sidewalls of the tyre) as a guide. A good rule of thumb is to press down with your palm on the top of the tread using your full body weight to get an idea of the pressure you have in the tyre. You should be able to press the tyre to about half of its overall volume, but not so much that you can feel the rim. Adjust the pressure accordingly.
Checking the sag
Now that the tyre pressures are set correctly we can look at the suspension. The first thing here is to ensure that the sag is set correctly. Sag is the amount the suspension compresses under the weight of the rider and allows the suspension to support the weight of the rider whilst absorbing impacts from the terrain. If the suspension sag is not set correctly the bike will feel too soft (reaching full travel too easily), or too firm (being unable to reach full travel).
If the suspension uses a coil spring then you'll need a range of different springs of different rates to adjust the sag (spring rate is essentially the firmness of the spring-sometimes referred to as spring ‘weight'). It's easier if the suspension uses air as a spring medium as this can be easily adjusted using a suspension specific shock pump.
Most suspension forks and air sprung rear shocks will have a sag indicator o-ring on the stanchion of the fork or rear shock making it easier to set the sag. Get the rider (if you're the rider you'll probably need a friend to help out with this) to wear all of the kit they'd usually take for a ride (i.e. hydration pack, tools, water bottle, lights, helmet, any body armour etc.) and get them to sit on the bike with the bike next to a wall so that the rider can support themselves. Ask the rider bounce up and down on the suspension a few times, and then carefully push the sag o-rings against the wiper seals of the suspension. Next, ask the rider to carefully step off of the bike ensuring they do not push down on the suspension when they do so.
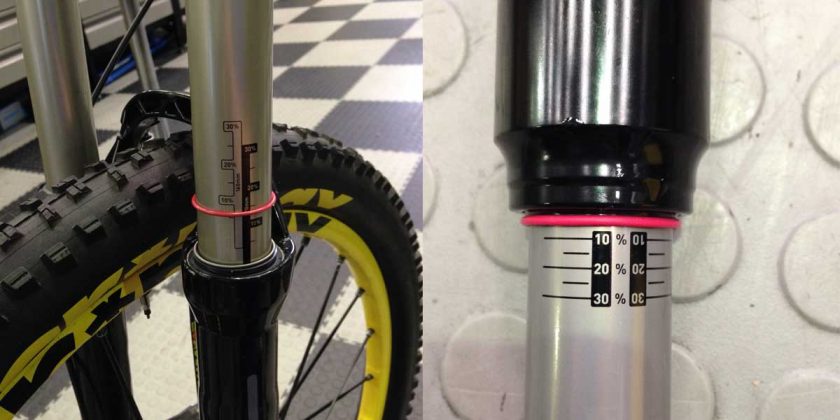
Next measure the gap from the top of the wiper seal to the bottom of the o-ring and refer to the manufacturers manual which will often quote the recommended sag in millimetres or as a percentage of total available travel (from 15-20% for forks and between 25-35% for rear shocks).
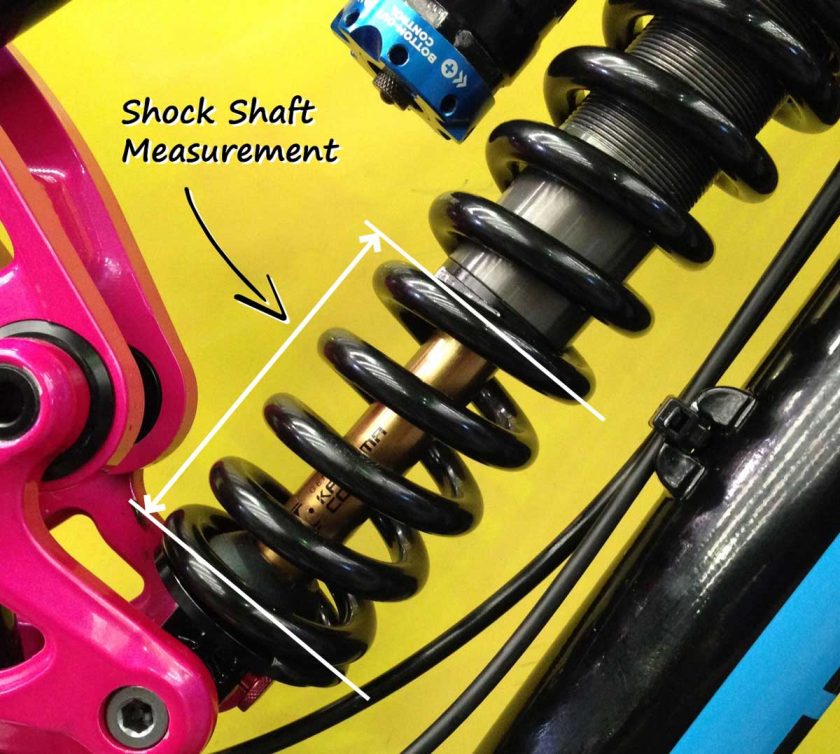
If the rear suspension uses a coil spring then, as mentioned, it's more difficult to use the o-ring to measure sag. Instead, first measure the exposed shock shaft length through the coils.
Then measure the distance between the two shock mounting bolts (commonly referred to as the ‘Eye to Eye' measurement), first without the rider on the bike then re-measure with the rider on the bike.
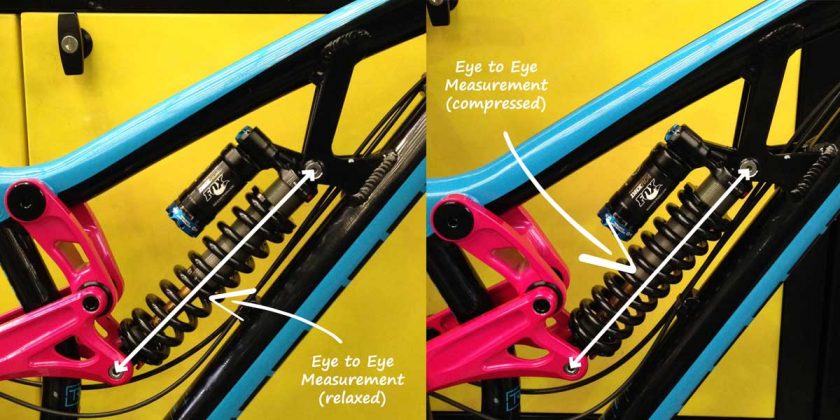 Take these measurements in inches and subtract the compressed eye to eye measurement from the uncompressed eye to eye measurement before dividing the number you get by the shock shaft length to get an overall sag percentage.
As an example, if the shock shaft measured 3", the uncompressed eye to eye 9.5" and the compressed eye to eye 8.8" then the formula would be (9.5-8.8)/3, which equals 0.23 or 23% sag.
A good quality air sprung suspension will come with a further adjustment by way of volume spacers that can be fitted to increase the progressiveness or ‘final firmness' of the suspension. The best way to test whether you need to fit (or remove) a volume spacer is to ride the bike on a smooth flat piece of trail and push as hard as you can down on the suspension. If the suspension reaches more than 90% of its travel you may want to fit a volume spacer, if it feels unduly firm and you struggle to get past 70% travel you may want to remove a volume spacer.
These are not very difficult jobs but do require specific tools and a bit of suspension knowledge. We'd recommend seeking advice from your nearest Cytech Accredited Shop using the shop search on our website-knowing what's wrong with your bike will save the shop time and you money!
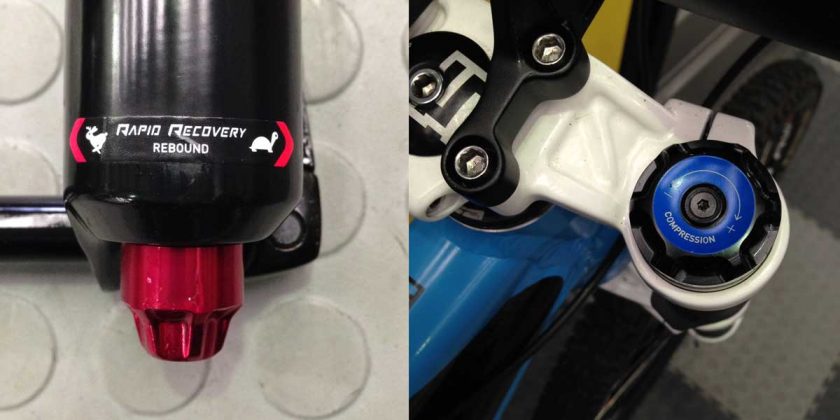
The external dials
Let's now look at making adjustments to the external dials of the suspension. These are usually located on the right hand (as viewed by the rider) leg of the fork and are mostly coloured blue and red. It's good to remember the adage ‘red for rebound' as the rebound adjuster is usually red and the compression adjuster blue. We are going to focus on the rebound adjuster as it has a profound effect on the way your suspension behaves.
 The best way to set your rebound on the forks is to start by winding the rebound adjuster to the full slow (‘+') position, push the fork down into about a third of its travel and quickly release the bars. The fork will take too long to extend back to its resting position so wind a click off of the rebound adjuster and repeat the process until the front wheel starts to lift off of the ground. At this point wind the adjuster back towards the slow one click for your ideal rebound speed.
On a rear shock finding the perfect rebound setting takes a bit more doing. Find a kerb that you can ride off of sat in the saddle and wind the rebound to the fully slow (‘+') setting before winding back to the fast (‘-') setting by two clicks (the extreme ranges of the adjusters are usually unusable). Next ride off of the kerb with your weight firmly on the saddle. The bike should return to sag slowly.
The goal here is to get the rear shock to ‘overshoot' the initial sag position before returning to rest at sag. If it does this more than once before returning to sag then you have the rebound set too fast. Wind the adjuster back towards the slow position a click until it overshoots just once.
Balancing the shocks
Finally if the bike you have is a full suspension one, then make sure both shocks feel balanced. This can be done by again riding on a smooth flat piece of trail, centring your weight on the bike and pushing down on the bars and pedals. The goal is for both shocks to return to the sag point at the same speed. If the rear shock feels faster or slower than the forks do then (assuming you have adjusted the forks rebound correctly) make adjustments to the rear shocks rebound until the bike feels balanced.
Following these tips will make the bike feel balanced, planted and predictable when the going gets tough on your favourite trail.