Bicycle maintenance guide: How to repair, service and look after your disc brakes
Bicycle maintenance guide: How to repair, service and look after your disc brakes
Posted on 18 Dec 2017
So, you've got a nice a new bike that has disc brakes on it, yet you've never really known how to maintain them yourself.
Just like their rim braking cousins, disc brakes have dos and don'ts that you should be aware of to get the best out of them.
However, if you end up not doing a "do", or even more importantly doing a "don't", then the consequences can be a lot more costly than your standard rim brakes.
Andrew, Cytech trainer and assessor at Specialized Canada, is on hand to give you the skinny about disc brakes and how to avoid some common pitfalls.
The types of disc brakes
Disc brakes can either be hydraulic or mechanical, with hydraulic brakes using brake fluid in either an open or closed system and mechanical systems being cable actuated with either a single piston or dual piston set-up. The information below will be useful no matter which system you have on your bike.
General points and maintenance
Hydraulic brakes work by using brake fluid inside sealed tubing running between the lever and the caliper, normally being either DOT fluid or mineral oil/fluid. Contamination will happen over time with both fluids, meaning that the system should be bled and fluid replaced periodically. The regularity will depend on a few things including the amount of use, however, as a rough guide, a yearly service is advisable.
Bleeding hydraulic brakes can be tricky, especially if you've never done so before, and with each brand there normally comes a slightly different process. One thing all disc brakes do have in common, though, is that the pads (and also rotors) are very susceptible to contamination, meaning that care should be taken at all times when considering any work around your disc brakes. Instructions can be found online, however, we would definitely recommend taking your bike to your nearest Cytech technical three qualified technician for a brake bleed and service-if done annually it can be a part of a regular service schedule for your bike.
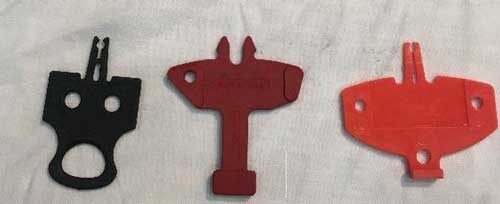
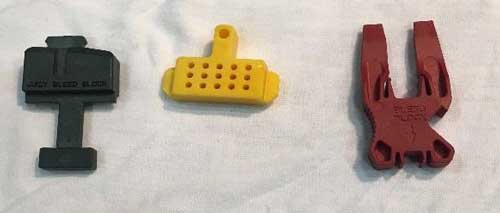
It is also worth noting that whenever your wheel(s) are removed, not just when you're performing maintenance, that it's wise to insert your brake block(s) in between the pads. These are usually supplied in the small parts box, along with all instruction manuals, and will keep the pads properly spaced even if the lever is depressed while the wheel is out. Above are examples of different versions of brake blocks supplied by different manufacturers.
Pad wear and replacement
Hydraulic systems are self-centring when it comes to pad alignment, which is one of their biggest pros over mechanical disc brakes. This means that even as the pads wear they should keep their alignment and not need much adjustment until fully worn.
Mechanical systems are easier to work on but require more regular maintenance. For example mechanical systems will usually need adjustments over time due to cable stretch, as well as periodic re-adjustment due to pad wear (similar to rubber rim brake pads). Another thing to consider is the model of caliper as it may only have a single moving piston-this means that you will need to adjust the ‘static' pad to bring it closer to the rotor as it wears. You normally have a knob or screw located on the back of this static side to allow you to do this. The ‘moving' pad then also needs to be adjusted as appropriate to get the right spacing-this is done in the ‘usual' way by tightening the cable.
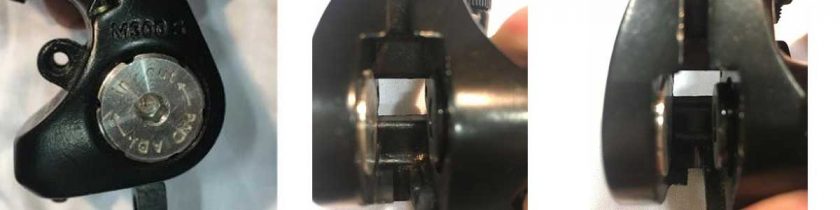
(From left to right) adjuster bolt, single sided caliper - open, single sided caliper - closed.
It is easiest to remove and replace pads when the wheel is removed. The following process of replacing pads is tailored slightly towards hydraulic systems but is very similar to the process for mechanical systems too. In either case, always make sure your hands and surroundings are clean to avoid contaminating the pads or the rotor.
Once the wheel is removed use a brake pad setting tool (or similar) to push the pistons back into their original position. Most pads are held in place with a cotter pin or threaded locking pin along with a clip to keep the pin in place if it comes loose. Remove the clip followed by the pin, then bring the pads out of the caliper. In most, if not all cases there will be a ‘return spring' that comes out with the pads-make note of the way the spring and both pads come out and their set-up. Insert the bleed block to keep the pistons in place.
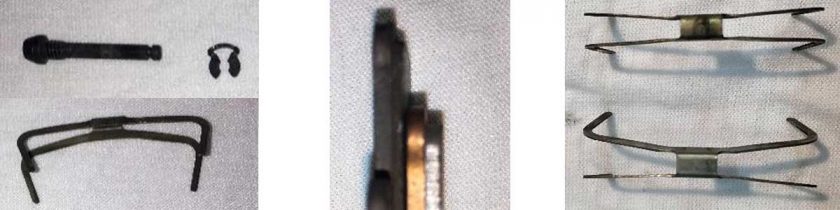
(From left to right) examples of the clip, pin and spring, new vs used pad thickness, uneven return springs.
Rotor wear
While cleaning your rotor it is also a good opportunity to check for wear. Rotors have a minimum thickness that is laser etched on the side of the rotor-in most cases the minimum is 1.5mm. Use digital calipers to determine if you need to replace your rotors, and when replacing your rotors make sure you also buy the correct one for your caliper and the material of the pads that you are running.

Bedding in new pads
As is the case with cars, disc brake systems on bikes also require a bed-in process. The goal is to transfer a film of brake pad material to the rotor to ensure that they interact together as expected throughout use. Most manufacturers will have a bed-in process outlined in their instruction manuals or website, but the result is always essentially the same. The process below is an example of how to bed in your new brakes.
Find a quiet street that is long enough for you get up to a decent speed and allow for a gradual slowdown. Focusing on one brake at a time, accelerate to a moderate speed and then apply the brakes with medium pressure until you are going at walking speed. Repeat this about 20 times. Now accelerate to a higher speed and then with firm pressure apply the brakes until you are going walking speed. Repeat this about 10 times. DO NOT LOCK UP THE WHEELS/USE THE BRAKES TO COME TO A FULL STOP during this process.
When you're done allow the rotors and pads to cool and you are good to go. You should do this every time you change your pads or your rotor.
Things to avoid with disc brakes
Above are some of the "dos" for your disc brakes, however, there are a few things you should definitely avoid doing.
- Spraying lube or any form of cleaner near your pads or rotor. Contamination will cause loss of braking power and an unholy amount of noise. Once pads are contaminated they need replacing. With the rotor, in a lot of cases if your rotor does come in contact with lube/oils etc. then a thorough clean (along with the caliper) with isopropyl alcohol should solve the issue. In extreme cases though a new rotor will be required.
- Using the wrong brake pad/rotor compound combination. Disc brake pads come in two common types, organic and metallic. Organic pads wear more quickly but are quieter than metallic. Metallic based pads are longer lasting and are seen more on gravity bikes that endure high intense braking loads in abrasive off-road conditions. Each of these pads bed into the rotor as explained earlier and should you switch pad type without changing/thoroughly cleaning the rotor, braking performance will be compromised along with the likelihood of increased noise.
- Using the wrong hydraulic fluid. Hydraulic systems are built to take only one type of fluid (either mineral oil or DOT (usually DOT 4 or 5.1) fluid). Each of these fluids have specific chemical makeups and using the wrong fluid will cause catastrophic damage to the seals in the lever and caliper, requiring at least a full rebuild or more likely replacement.
- Forgetting to clean up after bleeding. If you are able to do your own hydraulic bleed, always wash everything down afterwards. Isopropyl alcohol in a spray bottle is best followed by soapy water. DOT fluid is corrosive and will ruin the paint job on your bike or any other part it touches.
Now you know how your brakes like to be kept, you can enjoy your new stopping power and the consistency no matter what weather you're riding in!